
When uploading users, either via the manual method or the automated method, the first step is to create your CSV file. Below are some instructions and guidelines to help you create your CSV file.
General Guidelines
The following general guidelines are true regardless of what actions you're trying to accomplish with user uploads:
-
The CSV file has fields separated by a comma (or other delimiter) ONLY - no space. The first line contains the valid field names. The rest of the lines (records) contain information about each user.
-
Be careful with special characters in field information like quotes or other commas. Commas must be escaped. Rules and examples about how quotation marks are handled are discussed later in this document.
-
Test a CSV file with only one record before a uploading a larger file.
-
You can use a spreadsheet program such as Microsoft Excel to create the file with the required columns and fields, and then save the file as "CSV (comma delimited)". These files can be opened with simple text editors for verification.
Sample File
Here is a sample file that is valid for uploading users. You can either copy / paste it in your favorite CSV editor or download it here:
username,firstname,lastname,email
alex.bryan,Alex,Bryan,alex.bryan@somedomain.com
bea.chandler,Bea,Chandler,bea.chandler@somedomain.com
Required Fields
The system will not allow the creation of users without a username, full name and email address. As such, when adding users, the following fields are required:
username,firstname,lastname,email
These fields not required if you are updating users because all you need to pass when updating users is (a) a unique identifier such as the username, email address or Employee ID, and (b) the information that you want to update.
Optional Fields
The following user profile fields are optional when adding users. You may add them to your CSV file when adding or updating users:
institution,department,phone1,phone2,address,city,provincestate,country,postalzipcode,auth,timezone,idnumber
Password Field
When uploading users, you go through a wizard. One of the settings is "New user password". The default option is "Create password if needed and send via email". If this option is selected, then the password is optional in the CSV file. If however you select "Field required in file", then the field is required in your CSV.
password
There are some important rules to keep in mind for the password:
-
If the password is included in the CSV file, the value that you specify should meet the requirements for the system's password policy
-
If the password is included in the CSV file, the wizard will show a setting labelled "Force password change". The default option is that "User's having a weak password" will be forced to change their password. In this case, "weak" is determined by comparing the password you put in the CSV file with the system's password policy.
-
This option will not appear if the password column does not appear in the CSV file.
-
-
If the password is omitted from the CSV file, a password will be generated for each user and welcome emails will be sent out. The text for the welcome email language string with the identifier 'newusernewpasswordtext' and can be customized by following the Modifying Language Strings procedure.
-
You can also use the value of "changeme" in your CSV file. This option will not send the user a welcome email, but it will require them to change their email address the first time they log in. This option is not considered secure, particularly if you are creating a lot of users at the same time. If you use this option, any user who can guess someone else's username can log in by entering "changeme" in the password field.
Preferred Language
If your system supports multiple languages (English and French), you can specify the user's preferred language. The valid values are "en" and "fr_ca".
lang
Country Codes and Provinces
The country field uses a two-letter code in upper case. The country code for Canada is "CA" and the country for the United States is "US". Entering "ca" or "USA" for example will generate a database error. The concept is the same for provinces, which also use a two-letter code. For Ontario for example, the province code is "ON". See https://en.wikipedia.org/wiki/ISO_3166-2:CA for a list of codes for Canadian provinces and territories.
country, provincestate
Authentication Method
The authentication method can also be specified. The valid values are "manual", "ldap", "oauth2" and "saml2". These values are case-sensitive.
auth
Preferred Theme
If your learning environment has multiple sites (e.g. see What is Multi-site?), you can specify the theme to be used by individual users by using the "theme" column.
theme
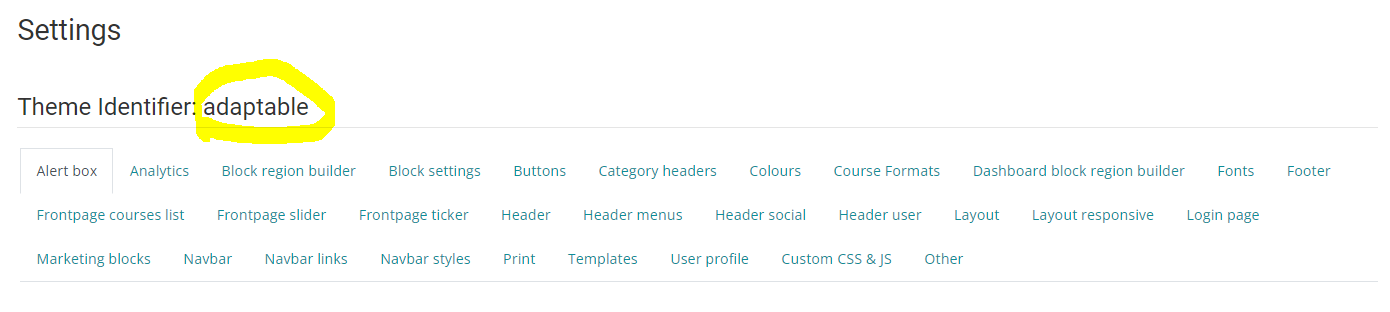
Each theme available in your system has a unique identifier, which is displayed in the theme's settings page. Using the example below (see image below), I would enter the value "adaptable" in the "theme" column in the CSV file to associate the user to the Adaptable theme.
Renaming Users
The username is considered a key in the system for many functions such as uploading learning records and attendance records. You can change the value of the username just like any other field, as long as "Allow renames" is set to "Yes'. In other words, if you had to change the username for a user where username=jsmith and idnumber=12345, you could create the following CSV file. In the "User mapping" section you would map the idnumber from the CSV file to the idnumber field in the system, and set "Allow renames" to "Yes". This would change the username from jsmith to jdoe. (Note that while "idnumber" is suggested in here, you can use any unique identifier in the user's profile.)
username,idnumber
jdoe,12345
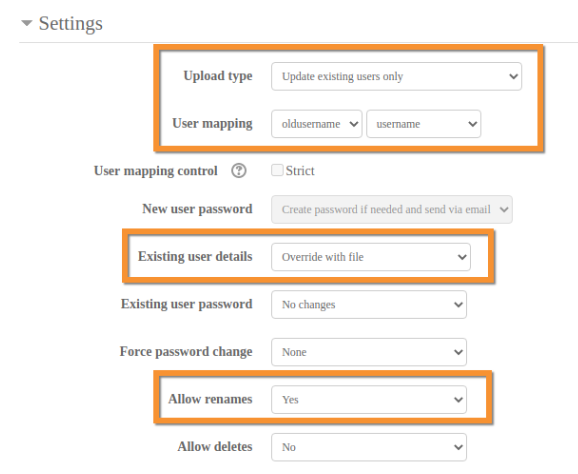
If you do not have any identifier other than username in your CSV or system, you must use a field called "oldusername" to rename users. Ensure you set the proper mapping and other fields in the user upload wizard properly as per the screenshot below.
Suspending Users
Special fields are used to suspend users.
suspended
If the "suspended" field is present, users with value 1 for it will be suspended and users with a value of 0 (zero) will be activated. In this case, all the fields may be omitted, except for the username (or the field used to uniquely identify the users to be suspended / activated).
After uploading the file, be sure to change the "Upload type" to "Update existing users only" and the "Allow suspending and activating of accounts" to "Yes".
Deleting Users
Special fields are used to delete users.
deleted
If the "deleted" field is present, users with value 1 for it will be permanently deleted. In this case, all the fields may be omitted, except for the username (or the field used to uniquely identify the users to be deleted). After uploading the file, be sure to change the "Upload type" to "Update existing users only" and the "Allow deletes" option to "Yes".
When you delete a user, you delete all the information associated with the user, including grades, certificates of completion, and their history. It is therefore recommended to suspend users rather than deleting them. Suspending users de-activates their account, but retains their information.
Working with Custom User Fields
Custom user profile fields, which are described in more details here, can also be uploaded via CSV. As they are custom, the list and name of fields will depend on which field your System Administrators added to your system.
Custom User Field Names
For this example, let's assume a custom user field name called "costcentre" (i.e. the unique shortname for that field).
When uploading information for a custom user field, you should use the following convention in the header of the CSV file:
profile_field_costcentre
The custom field must exist before you run the upload function.
Field Type: Alias
The Alias field type is a read-only field that allows you to concatenate multiple fields into one field. For example, if users have 4 supervisors, each being tracked in a separate field (i.e. supervisor01, supervisor02, supervisor03, supervisor04), you could still display them in one (1) column in reports by adding an alias field, simply giving it a name of "Supervisor", and select all 4 fields in the "User profile fields" section. As such, you cannot import information in an Alias field. You need to import the information in the fields is concatenates (e.g. profile_field_supervisor01, profile_field_supervisor02, profile_field_supervisor03, profile_field_supervisor04).
Field Type: Associated Input
When uploading user information via CSV, if an "associated input" field is created, you must always use the custom field to upload the information. In other words, if you create a custom field called "department" that is associated to the original department field in the system, your CSV file must contain a column name called "profile_field_department". Do not upload using the label "department".
Field Type: Checkbox
When uploading information in a checkbox, use the value of "1" to check it and "0" (zero) to uncheck it. Note that no value (e.g. an empty cell in your spreadsheet or "") is equivalent to adding a "0". In other words, if you have a column for a field that is a checkbox and do not specify a value, the checkbox for the users in question will be unchecked as a result of the upload.
If the value for the checkbox is anything other than 0, 1 or a space, the system will store the value in the database but visually will render the checkbox as unchecked.
Field Type: Date/time
When uploading to a Date/Time custom user field, the date format must be YYYY-MM-DD. For example, to show a date of September 1, 2017, the date must be 2017-09-01. If you are specifying the time, the convention is 'YYYY-MM-DD-HH-MM-SS' using the 24-hour time format. Note however that if the field itself is not configured to accept the time (e.g. it only accepts the date), then the HH-MM-SS portion of the value will be ignored.
If the format of a date/time is not understood by the system, the system will not return an error. The field will simply be left empty for the record in question.
Field Type: Dropdown Menu
When uploading to a dropdown menu, the values must pre-exist in the menu. If the value does not pre-exist, the system will still store the value in the database (e.g. it will not report an error), but it will not add it automatically to the dropdown menu. For example, if you track cost centres using a dropdown menu and your organization adds a new cost centre, simply passing the new value in the CSV will not add the value to the dropmenu menu. The value must be added using the procedure described in Managing Custom User Profile Fields.
Field Type: File Upload
Given that CSV is text-based, you cannot add files to a "File upload" field type.
Field Type: OCI ID
When uploading to an OCI ID field, the value must adhere to a very specific convention that includes the country, province, and acronym for the college, followed by the unique identifier for the user. All components must be separate by a hyphen (-). The complete list supported by your learning environment can be seen by going to Site Administration > OCI > User Identifiers.
For example if uploading the OCI ID for a Physician affiliated with the College of Physicians and Surgeons of Ontario with CPSO #12345, the value would be:
CA-ON-CPSO-12345
Field Type: Social
In earlier version, the learning environment default fields to hold information for ICQ Number, MSN ID, AIM ID, Yahoo ID, Skype ID, Web page. Given that most of these 3rd party systems are now deprecated, these fields were also deprecated. That being said, organizations who still wish to track this information can store it in this special field type.
Field Type: Text Area
You can upload information to a text area field. Note that you need to be careful when doing so and escape any special characters, and in particular, commas. If a comma is not escaped, the system will think that the comma represents the end of the field / column in your CSV. This is true of any field type, but is more common in text areas, where administrators may add whole sentences and paragraphs that often contain commas.
Field Type: Text Input
There are no special rules for text input. That being said, you still need to pay attention to the standard rules, such as escaping commas and the maximum length of the input field for example.
Assigning System Roles
System-level roles, such as System Administrators, System Coordinator and Course Creators, may also be assigned during and upload.
To assign the roles, you would use the "sysrole1" column. Multiple roles can be assigned to the same person using sysrole2, sysrole3, etc. fields. The numbers must go up in sequence starting at 1.
The values must be one of the following (case-sensitive):
-
For the System Administrator role, use "manager" (without the quotes)
-
For the System Coordinator rule, use "coordinator"
-
For the Supervisor role, use "supervisor"
-
For the Course Creator role, use "coursecreator"
sysrole1,sysrole2,sysrole3
You can also unassign system roles by entering the same shortname of that role prefixed with a minus symbol: '-'. If the user is currently assigned to that role, they are removed from it. If the user is not currently assigned to that system role, the field value is ignored. However, the field value must refer to a system role that does exist on the system, otherwise an error will occur.
So for example, the following spreadsheet would revoke the role of System Administrator for Alex and grant him the role of System Coordinator.
username,sysrole1
alex.bryan,-manager
alex.bryan,coordinator
Registering Users in Program, Courses and Face-to-face Sessions
To register users in programs, simply enter the program ID (i.e. the auto-incremented ID generated by the database, not the "ID Number" field that you enter in the web form) using the following headers in the CSV file:
program1,program2,program3
To enrol users in courses, simply enter the shortname of the course using the following headers in the CSV file:
course1,course2,course,3
In the above example, the user is enrolled in a course as a student for an infinite period of time. If you need to assign a role other than student or limit the enrolment duration, you can use the following headers:
course1,role1,enrolperiod1,course2,role2,enrolperiod2
The role can be "student", "editingteacher" or "teacher". The enrolment duration must be in days.
The sign up users for face to face sessions, simply enter the ID of the session using the following headers in the CSV file:
course1,session1,course2,session2
In the above example, session1 refers to the ID of the first session a user will be signed up for, session 2 to the second session, and so on. The ID of a session is identified by its URL when viewing a session. For example, the unique ID for "http://www.dualcode.com/mod/facetoface/sessions.php?s=139" is 139.
Note that adding users to classroom sessions can also be done using the procedure explained in the Importing Attendance Records article.
Adding Users to Sites, Cohorts and Groups
You can add users to sites and cohorts. Keep in mind that the concept of sites is restricted to multi-site deployments.
In both cases, you would use the "cohort1" column in your CSV file. If you need to add a user to more than 1 site / cohort, you could use cohort2, cohort3, and so on. The '1' in cohort1 is important. Simply adding a column called "cohort" without the '1' will not work.
The value for the site / cohort must be the ID of the site / cohort (e.g. the primary key automatically assigned to each site / cohort by the system's database) or the non-numeric ID that you enter yourself in the web form when creating a site / cohort. The site / cohort names is not supported, and if the ID that you enter yourself is only a number, you cannot use it as part of your CSV. That is because if you CSV contains simply a number, the system will assume you are referencing the primary key of the site / cohort.
cohort1,cohort2,cohort3
Users may also be assigned to groups in courses (group1 in course1, group2 in course2, etc.). A group is identified by name or id (numeric group names are not supported).
group1,group2,group3
Other Rules
There are a few other rules to keep in mind when preparing your CSV file:
-
Commas within a field must be encoded as , - the script will decode these back to commas
-
For Boolean fields, use 0 for false and 1 for true
-
When dealing with quotation marks, the following, the following values will be transcribed (represented by → below) from the CSV to the system:
-
Ottawa → Ottawa
-
'Ottawa' → 'Ottawa'
-
"Ottawa" → Ottawa
-
""Ottawa"" → "Ottawa"
-
-
To prevent users from receiving a large number of e-mails from courses or forced subscription forums, use the maildigest field. The options for this field are:
-
0 = No digest
-
1 = Complete digest
-
2 = Digest with just subjects
-
Other Hints
Encoding File Format
On the initial "Upload user" screen, you may select the file encoding format from a pull down list. These include UTF-8 (the default), ASCII, ISO-8859-1 to ISO-8859-11 or any one of over 36 formats. You need to make sure that your CSV file matches the encoding format that you select here. If you are unsure, you may leave the default, which is to let the system auto-detect the encoding format.
Field Size Limits
Some fields have maximum character lengths. Typically the file will import to the preview list screen but not finish the process. Common fields to cause problems are "Institution" which is limited to 40 characters, and "City", also limited (20 characters). The error will be "User not added - error".
Spreadsheet
If you use a spreadsheet program such as Microsoft Excel to create your CSV file, check the resulting output in a text editor before you upload it. It is possible to get trailing commas on each line from an empty field if you have added and deleted columns of information prior to saving the final file. Also check the character encoding. A CSV file is a simple text file (ASCII or Unicode) that can be used to upload user accounts.
Excel translates passwords that begin with - (minus) or + (plus) as zero, even when saving as CSV and saying "Yes" to "Keep this format, and leave out any incompatible features." Check for this before uploading, as a zero halts the upload process.
If you use a formula in Excel to create fields (for example, the concatenate function to create a username), then remember to copy the cells with the formula and use special paste with values checked to make them into an acceptable data for a CSV file.
The upload will also fail if you have trailing spaces at the end of your data fields. Often, this cannot be removed with a simple Find " " and Replace with "". If information has been copied from web sources than it is possible to include non-breaking spaces which will prevent your upload from being completed correctly. To find these invisible spaces, use the Find and Replace function in Excel. In the find field, hold alt and type 0160. Leave the replace field blank.
Special Fields
Maildisplay, htmleditor and autosubscribe can be passed in your CSV, but they can also be easily set using the wizard if you intend on using the same value for all users when creating them.